Get a clear view of your finances
Manage your budget fearlessly, step by step with QOQO, it’s so easy!

Track your expenses day by day
Manage your budget like a pro
Live a stress-free life
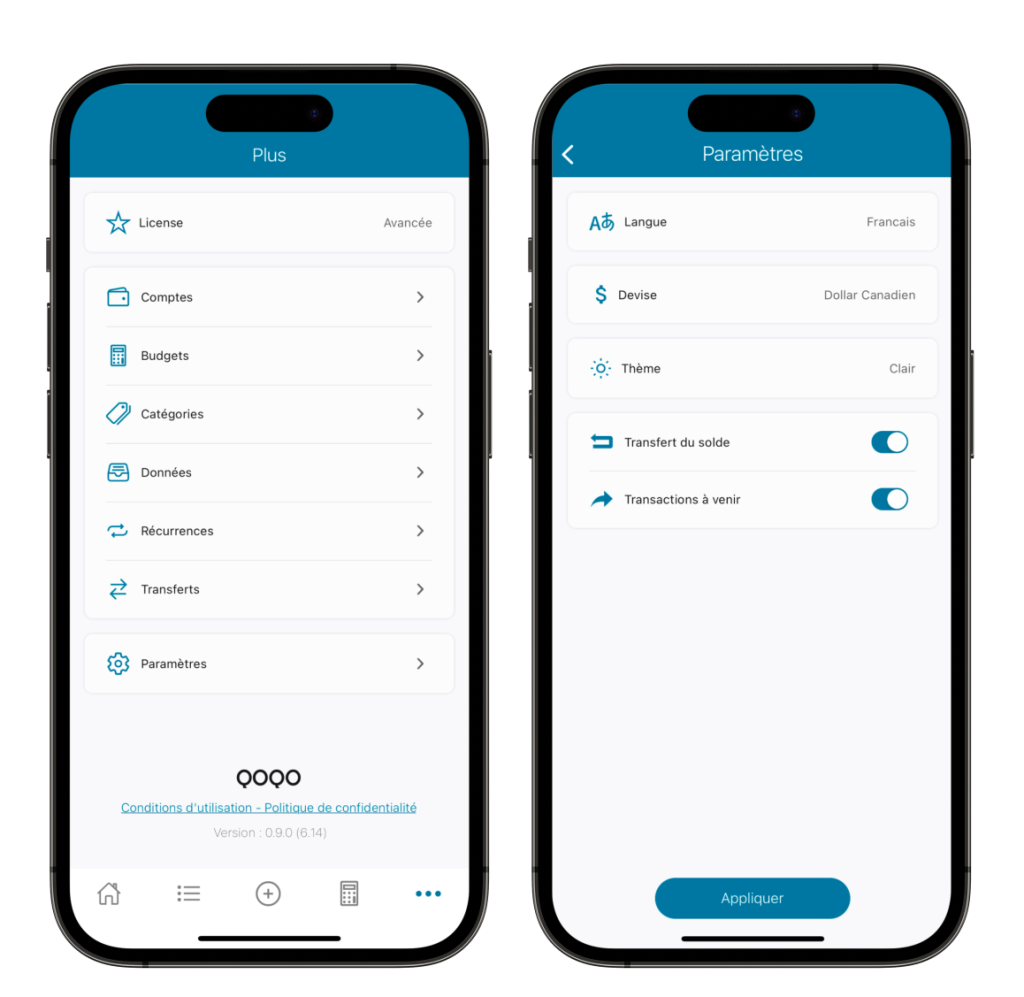
Step 1: Set important features of your budget and expense app
Before you start using QOQO, we recommend you check a few settings. Click on the three dots in the navigation menu, then on “”Settings””. You will then be able to choose between English or French, select the currency you want to use, have the app’s theme set to day (light) or night (dark) mode, select the balance transfer and upcoming transaction functionality.
The carry-over function allows you to accumulate the balance of month N to the following month. Example: if the balance of March is + $100, this amount will be automatically added to your April income.
The balance of an account is the difference between the expenses and the receipts at a given time. In other words, it is the total amount of money available in your account after taking into account all transactions made in that account, including deposits, withdrawals, payments and fees. The balance can be positive if the account has a surplus of money (that’s what you want), or negative if the account is overdrawn (not good!). QOQO, your expense tracking app automatically updates your balance to reflect the movement of money in your account. Here’s how a balance is calculated: income – expenses = balance
The upcoming transaction feature allows you to display all future transactions that you have scheduled through the recurring feature. This way, you won’t forget the expenses and incomes that automatically come out of your account.
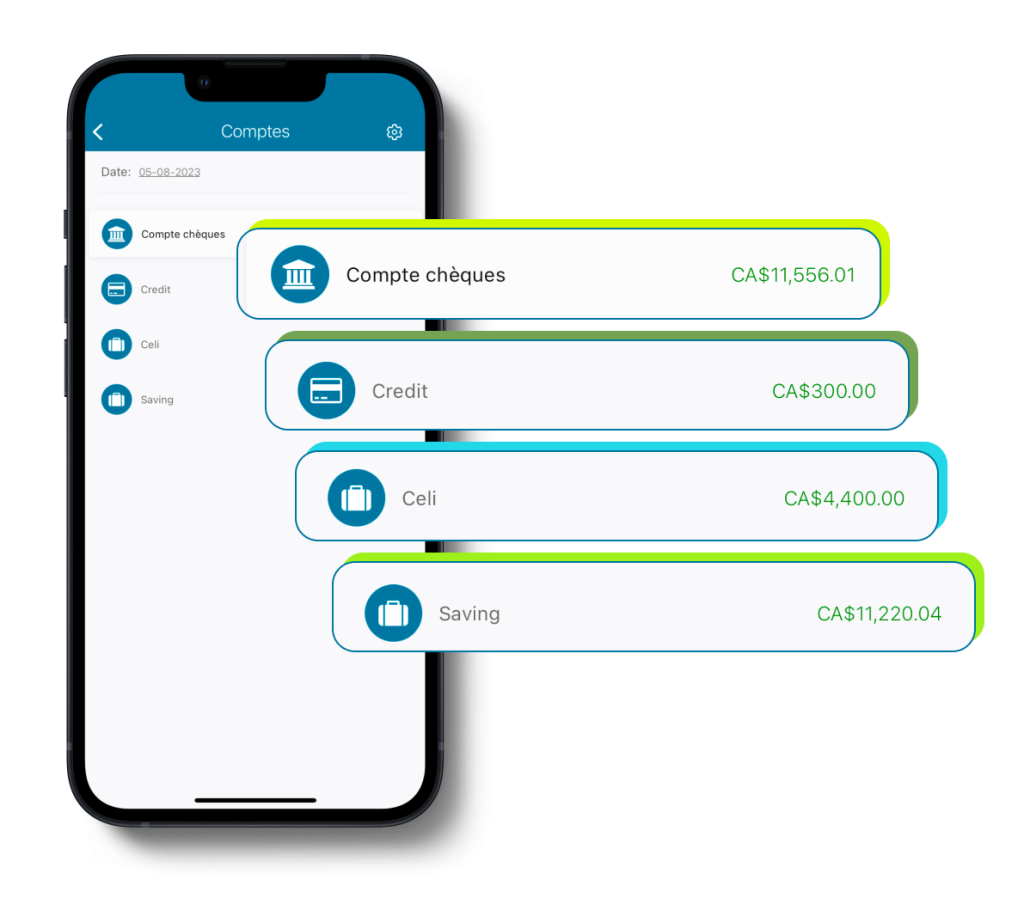
Step 2: Create your different accounts: checking, credit card or savings
The basic version of QOQO includes one predefined checking account. However, QOQO Premium allows you to add up to 10 accounts. You can add your checking, credit card and savings accounts. Note, that these are only labels, you can name each account as you wish to easily find your way around.
To add an account: Click on the three dots in the menu, then on “Accounts”. The “”+”” at the top right will allow you to easily add a new account. You will also be able to modify the settings of an existing account.
To get a preview of the account: Go to the house in the menu. The wallet on the top left will allow you to select the account you want to display in the app. You will also have an overview of the balance of each account and filter by date. Click on the wheel to add a new one or change the settings of an existing account.
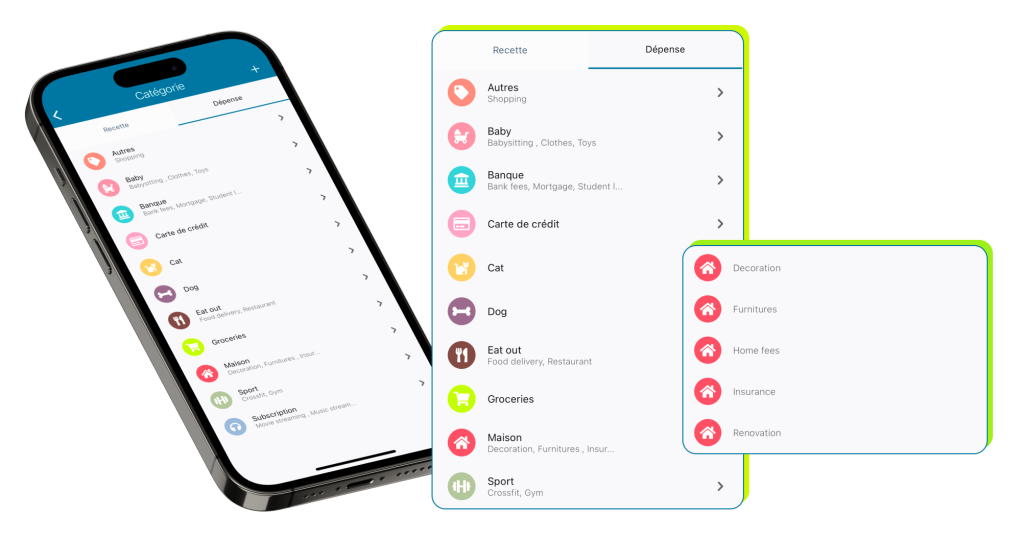
Step 3: Determine your expense and income categories
By clicking on the three dots in the menu, select “categories”. Then add your different expense and revenue categories.
By default, our QOQO expense tracker app includes 5 main categories: salary, bank, home, credit card, and other. So you can start using it right away. For more customization, QOQO Premium gives you the ability to create an unlimited number of categories.
Step 4: Add your transactions
To add your transactions, click on “”+”” in the navigation menu. You can then define it as an expense, revenue or transfer. Give it a description, an amount, a date, a category or subcategory, an account and a frequency if necessary.
Step 5: Make transfers between accounts
A great feature of our expense tracking app is the ability to make transfers between accounts. It’s super easy, just follow the same steps as for a transaction and choose “transfer”. In the account section, choose the sender account and the receiver account. To see the list of all your transfers, click on the three dots and then on “transfers”.
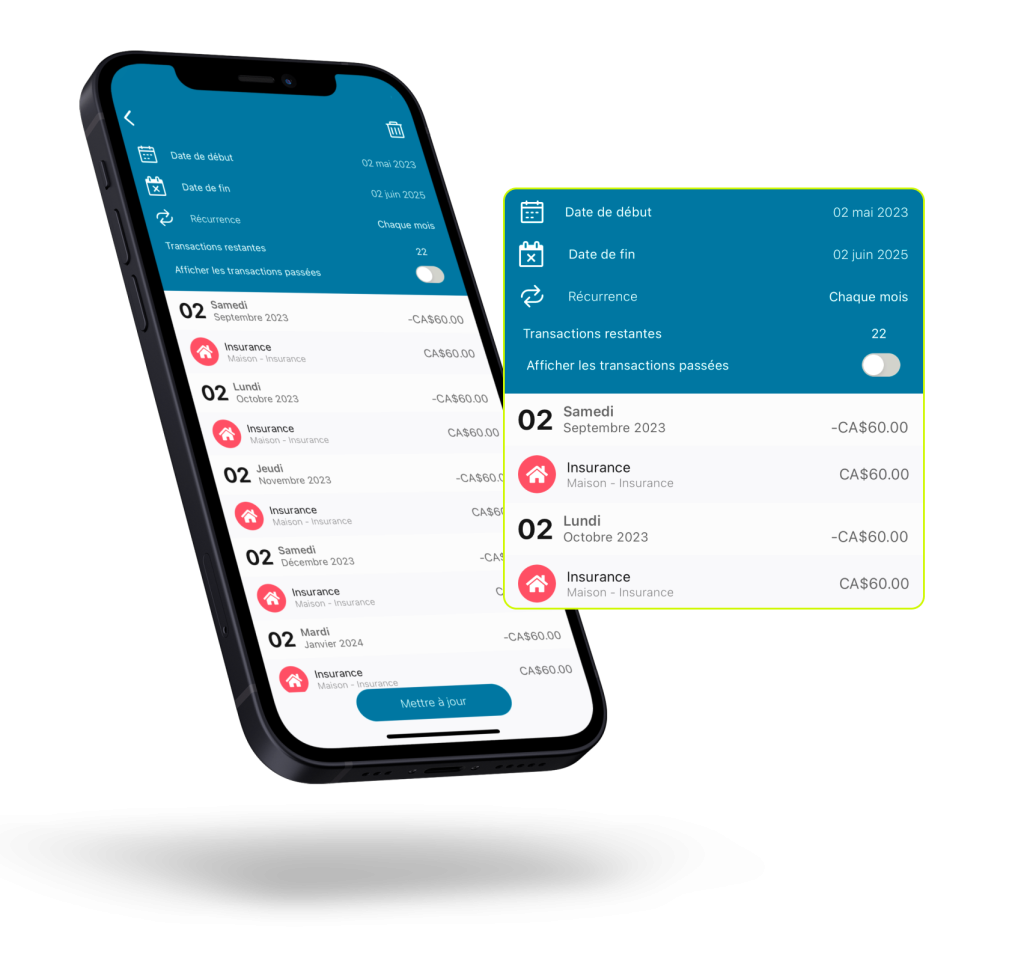
Step 6: Repeat automatic transactions
When you create a new transaction, click on the repeat tab to set the frequency and end date. This way, the transaction will be debited or credited automatically at the defined frequency.
Step 7: Determine how much you don’t want to spend
Tracking your expenses is great, but managing your budget properly will help you reach your life goals.
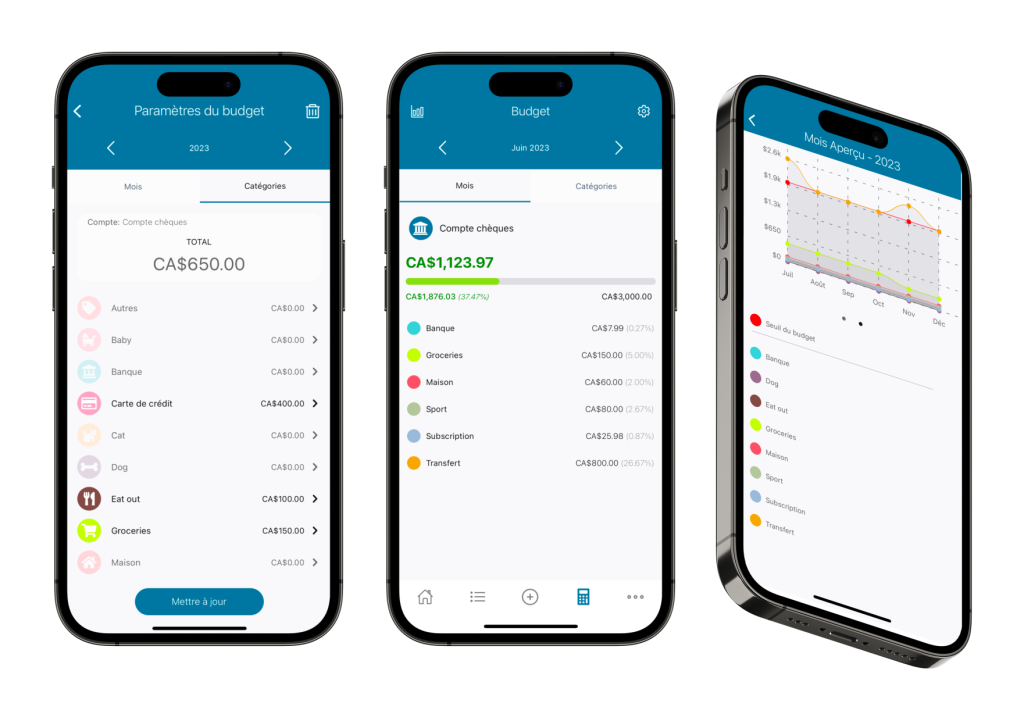
Our budgeting app gives you the ability to set a monthly not-to-exceed amount. You will be able to follow the evolution of your expenses in real time.
Click on the wheel to define your budget by month and for the year you want.
For each account, you can then adjust in advance the budget allocated for each month of the selected year. This allows you to plan for the long term. Cool, isn’t it?
QOQO Premium allows you to go even further by setting a goal for each spending category. In addition, our budget app gives you a visual overview of your financial performance over the year. A great way to take accountability.
Step 8: See where your money is going and adjust your spending accordingly
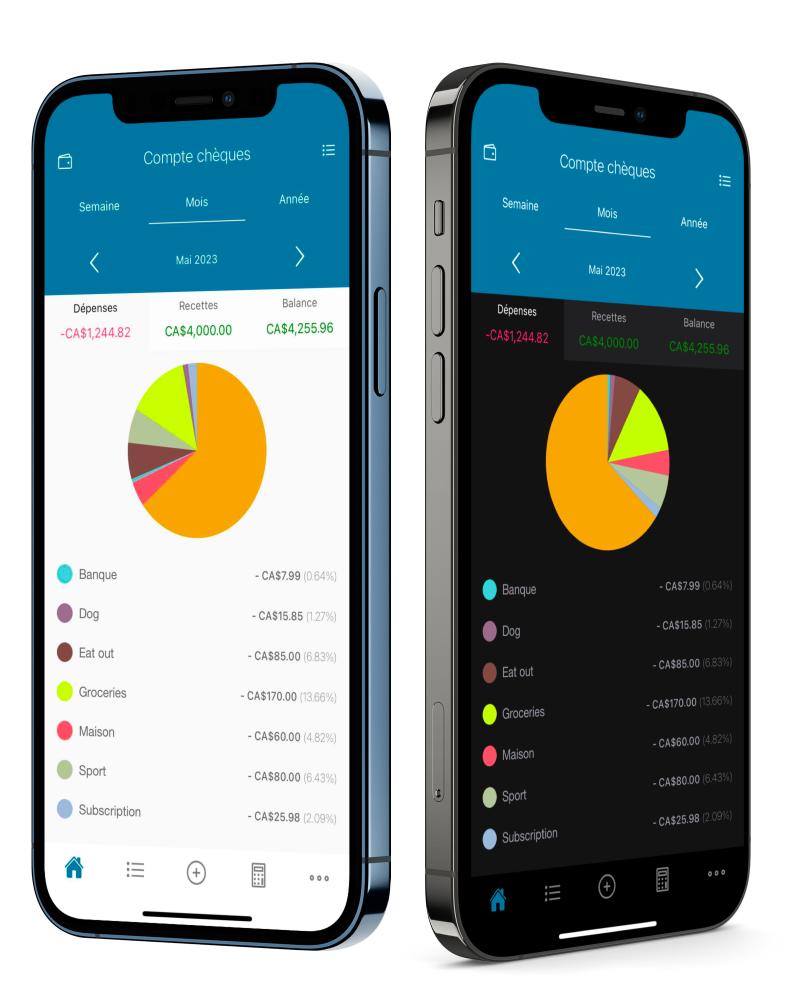
What’s the point of doing all this if you don’t know where your money is going, right? With QOQO, your budget tracking app, you can identify your spending habits, know where you’re spending the most, set goals to reach, and make the right decisions to make your money grow and pay off debts.
By clicking on the “house” in the menu, you can see in real time the share of each category, the total amount of your expenses or your income per week, month or year. Thus, you will know exactly how you spend your money. Finally, the budget section will tell you how much you have left to spend.
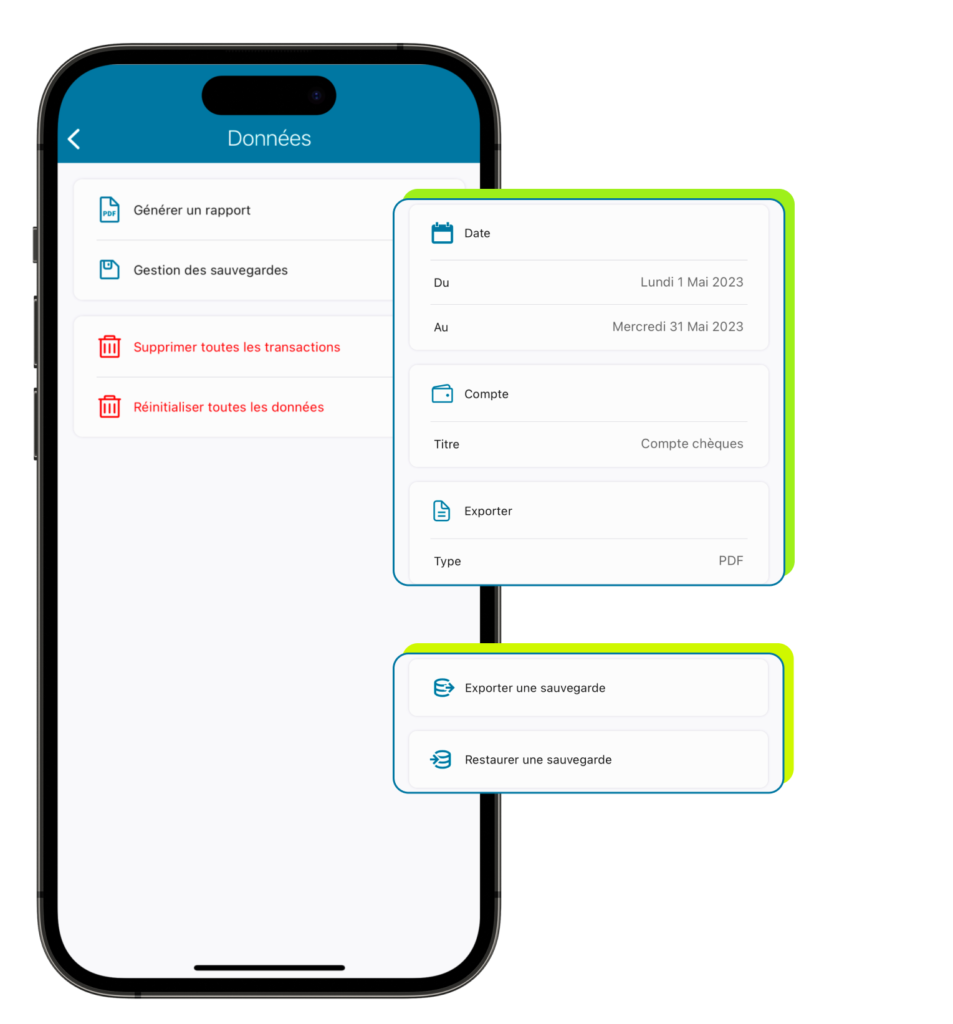
Step 9: Back up your data frequently
Consider backing up your budget app data regularly to your phone, Google Drive, iCloud, Dropbox, etc. This also allows you to import a previous version if needed.
Step 10: Get a pdf summary of your transactions
To get a pdf, cvs or .xlsx summary of your transactions, click on the three dots in the menu and go to “data”. Then select “get a pdf summary” and indicate a date range, the associated account and click on PDF to save it to your phone.
Manage your finances like a pro
today with QOQO!
Get your new spending and budget tracking app now.
It’s free!
All our tips for spending smarter and building the life you deserve!
Sign up for our newsletter!
By entering your e-mail address and first name, you agree to receive communications from QOQO Budget by e-mail and you acknowledge that you have read our privacy policy. You can unsubscribe at any time using the unsubscribe link provided in each e-mail. Rest assured, we won’t sell your information to third parties.